Contact Us
Thought Leadership

AWS with Terraform: Setting up an Integration for CI/CD Pipeline

By Hugo Daniel Barrera Casas, Cloud Engineer at IO Connect Services
December 7, 2021

CI/CD Pipeline

Multiple tools allow the creation of infrastructure as code. AWS has its tool, CloudFormation, being very useful and working natively with the rest of AWS services. However, many engineers find that customers look for solutions that can be adapted to other providers without AWS services in their daily work. For this reason, AWS allows integration with platforms such as HashiCorp Terraform. Terraform is an open-source tool for creating, changing, and versioning infrastructure safely and efficiently. AWS with Terraform can be managed similarly to CloudFormation.

In this article, Terraform will generate the infrastructure and implement it automatically through CI/CD. Infrastructure state files must be preserved for later reference, modification, or destruction by subsequent deployments to a durable backend. The CI/CD solution is flexible enough to implement many other AWS services.

Architecture diagram

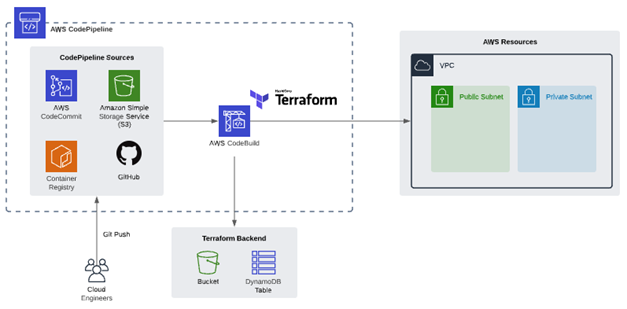
For this solution, we will use AWS CodePipeline, an automated service to form the foundation of the CI/CD pipeline. CodePipeline helps us automate our release pipeline through build, test, and deployment.

We will use AWS CodeBuild, a fully managed CI service that compiles source code, runs tests, and produces software packages that are ready to deploy.

  1. Create the necessary files so that Terraform can be executed within the pipeline.
  2. Store the files in the CodeCommit repository. (We can use another GitHub repository, AWS S3, Container Registry, but CodeCommit will be used for this case.)
  3. Use CodeBuild within CodePipeline to download and run Terraform.
  4. Store status files within S3 and build information within a Dynamo table.
  5. Run the pipeline to create the infrastructure, and it updates automatically when it detects a change in the Terraform file.

AWS with Terraform: Let’s set it up the integration for CICD pipeline!

Create an AWS and Terraform Backend

First, generate the infrastructure that will serve as a Backend for AWS and Terraform. A new Amazon Simple Storage Service (S3) bucket and Amazon DynamoDB table store the Terraform state files outside the CI/CD pipeline. Terraform uses these files to map the resources to the configuration, keep track of metadata, and improve performance for large infrastructures.

Create a DynamoDB table

  1. Navigate to the Amazon DynamoDB console, and then choose Create table.
  2. Give your table a name like tf-state-lock-dynamo.
  3. Enter LockID as your Primary key, keep the box checked for Use default settings, and choose Create.

Create an S3 bucket

  1. Navigate to the Amazon S3 console, and then choose Create bucket.
  2. Enter a unique name and choose the same Region you are using for the rest of your resources.
  3. Enable Versioning and Default encryption, and then choose Next.
  4. Select Block all public access, choose Next, and then select Create bucket.

Create Repository and AWS Terraform files

Create AWS Codecommit

CodeCommit will be used as a repository, as it offers data security, and it can be integrated with AWS IAM to provide detailed access to information. Within this repository, you will find the configuration files for Terraform and the files for creating the infrastructure.

  1. Navigate to the AWS CodeCommit console, and then choose Create repository.
  2. Enter a name, description, and then choose Create. You will be taken to your repository after creation.
  3. Scroll down, and then choose Create file.
  4. You will be taken to a new screen to create a sample file, write readme into the text body, name the file readme.md, and then choose Commit changes

We must create file to initialize the Master branch that will not interfere with the build process. It can be a txt or informational file, and since it is not important to the process, it can be deleted later.

Create Terraform files

Create a Terraform file, which contains the following code:

The infrastructure provider to use is specified in our case is AWS, and then the Backend code used by Terraform is generated. Once these two blocks have been created, we proceed to build the infrastructure in AWS, for example, the creation of a VPC with two Subnets.

Once this file is configured, we will save it with the name "main.tf".

Now we must create the file "buildspec.yaml" which will deploy Terraform within CodeDeploy and execute the Terraform plans.

It is important to obtain the most recent version of Terraform, to ensure that we run the application with the latest updates.

For the pre_build section, the Terraform init command will be placed, which is responsible for initializing the Terraform components.

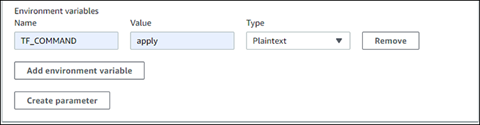
Then in the build section, the command "Terraform $ TF_COMMAND -auto-approve" will be included, which will generate a self-approval instruction for applying the changes in the Terraform template.

And finally, the command "echo Terraform $ TF_COMMAND completed on` date` " is appended in the post_build section, which is simply a message that informs us about the date on which this deployment was completed.

Using Git Bash we will upload these files to our repository in AWS CloudCommit. It can be loaded directly to the main / master branch or some other secondary branch and then merged with the main / master branch, depending on the CI/CD policy that you want to implement.


Automate CI/CD deployment to AWS with Terraform

Create the CI/CD Pipeline

Next, the release flow will be created with AWS CodePipeline. The data origin will be taken from AWS CloudCommit.

  1. Navigate to the AWS CodePipeline console, and then choose Create pipeline.
  2. Enter a Pipeline name, select New service role, and then click Next.
  3. We need to select AWS CodeCommit, then choose the CodeCommit repository and choose master or whatever branch where the codes have been stored for the source provider.
  4. Select the option of Amazon CloudWatch Events (recommended) as detection option, and then click Next.
  5. For Build provider, choose AWS CodeBuild, change your Region as needed, and choose Create project 
  6. Enter a Project name and description, and then go to the Environment section.
  7. Select the Managed image for Environment image, and for the other options, select the following:
    1. Operating system: Ubuntu
    2. Runtimes(s): Standard
    3. Image: aws/codebuild/standard:1.0
    4. Image versionAlways use the latest image for this runtime version
  8. Select the checkbox under Privileged, select New service role, and note this Role name because you will be modifying it later.
  9. Choose the Additional configuration dropdown menu, scroll down to Environment variables, and enter the following values.
    1. Name: TF_COMMAND
    2. Value: apply
    3. Type: Plaintext

Enviorment variables

  1. In the Buildspec section, choose Use a buildspec.yaml.
  2. In the Logs section, choose the checkbox next to CloudWatch logs – optional, and then select Continue to CodePipeline
  3. Now, back in the CodePipeline console, choose Next, choose Skip deploy stage, and click Skip when prompted.
  4. Confirm your details are correct in the Review screen, and then choose Create pipeline.

After launching the pipeline, a status view will show, whether the execution was carried out incorrectly or completed successfully. In the same way, we can enter the CodeBuild to have a more detailed view of what is happening within the execution, this only by selecting the Build option in the pipeline.

We can also see previous CodePipeline runs by choosing the History view on the navigation pane on the left. This view is also helpful for viewing multiple concurrent CodePipeline executions.

The pipeline will fail in the first creation attempt due to the user's lack of permissions, so if this error occurs, it is necessary to assign the required permissions for this deployment.

CodeBuild Role

Once the pipeline is executed, it generates an error because the role cannot create the resources and access to S3 and the Dynamo table. Therefore it is necessary to modify the role used by CloudBuild.

  1. Navigate to the IAM Console, and then choose Roles from the navigation pane.
  2. Search for the CodeBuild service role, select it, and then choose Add inline policy.
  3. Choose the JSON tab and paste it into the following policy. Ensure you populate the Resources section of the policy with the ARN of your S3 Bucket, and DynamoDB table created.
  4. Choose Review policy, enter a name for the inline policy, and then select Create policy.

Deploy resources with CodePipeline

Having completed the steps above, we can now relaunch the pipeline.

  1. Navigate to the CodePipeline console, and then select the pipeline.
  2. Release change.
  3. This will generate a new Build.
  4. AWS CodeBuild offers the ability to have visibility into your process. By selecting the option within AWS CodePipeline, you can see the output information that Terraform is generating and errors, environment variables, and logs.
  5. After a successful deployment, navigate to the AWS console and find the resources created by the pipeline.
  6. In this way, resources are created automatically in AWS with Terraform.

Conclusion: The Benefit of Setting Up an Integration of AWS with Terraform for CICD Pipeline

In this article, we learned how to use AWS Developer Tools to create a CI/CD pipeline that we can use to automate AWS Terraform deployments of infrastructure. By using Terraform and CI/CD, the engineers can:

  • Reduce human error and increase automation by provisioning infrastructure as code.
  • Provision infrastructure across 300+ public clouds and services using a single workflow.
  • Deliver consistent testing, staging, and production environments with the same configuration.

Related Insights

We are results-driven with a focus on providing customer service excellence

IO Connect Services is here to help you by offering high-quality cloud technology solutions.
Connect with us
®2024 IO Connect Services
Privacy PolicyCookie Policy
magnifiercrossmenuchevron-down
linkedin facebook pinterest youtube rss twitter instagram facebook-blank rss-blank linkedin-blank pinterest youtube twitter instagram