
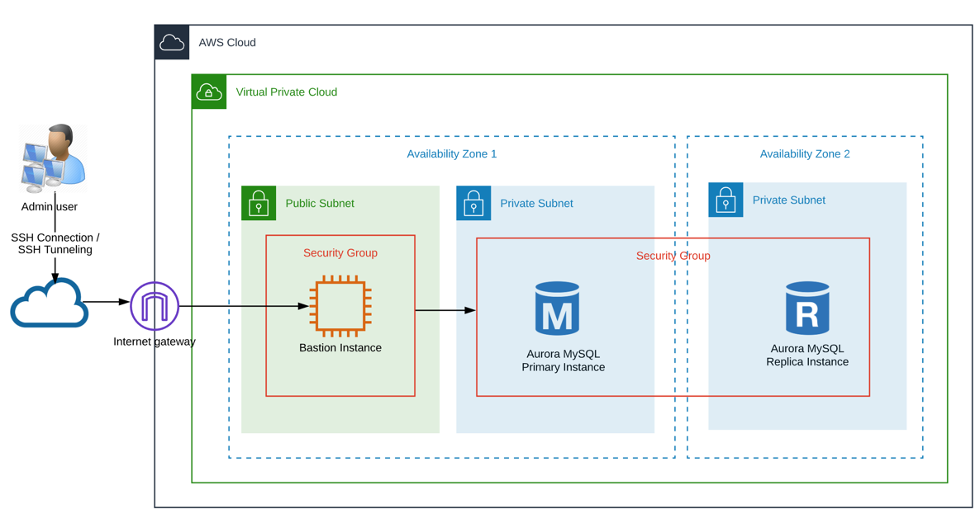
This article describes how to deploy the infrastructure needed for an Amazon Aurora MySQL DB Cluster with 2 DB instances. All the infrastructure has been made from an Amazon CloudFormation template based on the network isolation using Amazon VPC, private networks, a bastion host, and security groups. In addition, there is a section that shows the steps to connect with the Aurora MySQL DB through SSH tunnel using the bastion instance as a proxy.
Create an Amazon Aurora MySQL DB based on several AWS security and high availability best practices using AWS CloudFormation.
Below, the solution diagram is shown, which will be working throughout the article.
The following best practices apply in this article:
In this step, we will choose the primary CIDR block for the VPC, which will allow us to create an "N" quantity of subnets. In this example, we choose a class B CIDR block (172.16.0.0/16).
"VPC": {
"Type": "AWS::EC2::VPC",
"Properties": {
"CidrBlock": "172.16.0.0/16",
"EnableDnsHostnames" : true,
"EnableDnsSupport" : true,
"InstanceTenancy" : "default",
"Tags": [{
"Key": "Name",
"Value": {"Fn::Join" : ["-",[ "VPC", { "Ref": "Environment" }] ]}
}]
}
}
We will be created 3 subnets -1 public and 2 privates-: PrivateSubnetA (172.16.1.0/27), PrivateSubnetB (172.16.2.0/27), and PublicSubnet1 (172.16.3.0/27) and despite having created a class B primary CIDR block, the subnets only allow 30 host maximum with the netmask: 255.255.255.224.
"PrivateSubnetA": {
"Type": "AWS::EC2::Subnet",
"Properties": {
"AvailabilityZone": { "Fn::Select" : [ 0, { "Fn::GetAZs" : { "Ref" : "AWS::Region" } } ] },
"VpcId": { "Ref": "VPC" },
"CidrBlock": "172.16.1.0/27",
"Tags": [{
"Key": "Name",
"Value": {"Fn::Join" : ["-",[ "DB-PrivSubA", { "Ref": "Environment" } ] ]}
}]
}
},
"PrivateSubnetB": {
"Type": "AWS::EC2::Subnet",
"Properties": {
"AvailabilityZone": { "Fn::Select" : [ 1, { "Fn::GetAZs" : { "Ref" : "AWS::Region" } } ] },
"VpcId": { "Ref": "VPC" },
"CidrBlock": "172.16.2.0/27",
"Tags": [{
"Key": "Name",
"Value": {"Fn::Join" : ["-",[ "DB-PrivSubB", { "Ref": "Environment" } ] ]}
}]
}
},
"PublicSubnet1": {
"Type": "AWS::EC2::Subnet",
"Properties": {
"AvailabilityZone": { "Fn::Select" : [ 0, { "Fn::GetAZs" : { "Ref" : "AWS::Region" } } ] },
"VpcId": { "Ref": "VPC" },
"CidrBlock": "172.16.3.0/27",
"Tags": [{
"Key": "Name",
"Value": {"Fn::Join" : ["-",[ "DB-PublicSubE", { "Ref": "Environment" } ] ]}
}]
}
}
To have internet access we will create and attach an internet gateway to the VPC.
"internetGW": {
"Type": "AWS::EC2::InternetGateway",
"Properties": {
"Tags": [{
"Key": "Name",
"Value": {"Fn::Join" : [" ",[ "InternetGW", { "Ref": "Environment" }] ]}
}]
}
},
"AttachGateway": {
"Type": "AWS::EC2::VPCGatewayAttachment",
"Properties": {
"VpcId": { "Ref": "VPC" },
"InternetGatewayId": { "Ref": "internetGW" }
}
}
Now, we will create the route tables. The public route table will have the internet gateway attached and the public subnet associated, the private route table will have the two private subnets associated.
"PrivateRouteTable": {
"Type": "AWS::EC2::RouteTable",
"Properties": {
"VpcId": { "Ref": "VPC" },
"Tags": [{
"Key": "Name",
"Value": {
"Fn::Join" : ["-",[ "PrivateRT", { "Ref": "Environment" }] ]
}
}]
}
},
"PublicRouteTable": {
"Type": "AWS::EC2::RouteTable",
"Properties": {
"VpcId": { "Ref": "VPC" },
"Tags": [{
"Key": "Name",
"Value": {
"Fn::Join" : ["-",[ "PublicRT", { "Ref": "Environment" }] ]
}
}]
}
}The purpose of the Bastion Host is to restrict access to an application or database instance, as well as to provide a controlled entry to the private network that in this example will be the Aurora DB Cluster.
"BastionInstance": {
"Type" : "AWS::EC2::Instance",
"Properties" : {
"ImageId" : { "Ref": "AMIID" },
"InstanceType" : "t2.micro",
"KeyName" : { "Ref": "BastionKeyName" },
"NetworkInterfaces" : [ {
"AssociatePublicIpAddress" : true,
"DeleteOnTermination" : true,
"Description" : "Network interface for the bastion instance",
"DeviceIndex" : "0",
"GroupSet" : [ { "Ref": "SGWebInterface" }],
"SubnetId" : { "Ref": "PublicSubnet1" }
}],
"Tags" : [ {
"Key": "Name",
"Value": {"Fn::Join" : ["-",[ "BastionHost", { "Ref": "Environment" }] ]}
}],
"Tenancy" : "default",
"Volumes" : [ {
"Device" : "/dev/sdh",
"VolumeId" : { "Ref": "BastionVolume" }
}]
}
},
"SGWebInterface" : {
"Type" : "AWS::EC2::SecurityGroup",
"Properties" : {
"GroupDescription" : "Security group for bastion host",
"VpcId" : { "Ref": "VPC" },
"Tags" : [ {
"Key": "Name",
"Value": {"Fn::Join" : ["-",[ "SG-BASTION", { "Ref": "Environment" }] ]}
} ]
}
}
We will create an Aurora DB Cluster that will consist of two DB instances (Primary and Replica instance) compatible with MySQL. Both instances will be separated into two Availability Zones and into private subnets. Consider the following properties in the cluster:
"AuroraDBCluster": {
"Type" : "AWS::RDS::DBCluster",
"Properties" : {
"BackupRetentionPeriod" : 1,
"DatabaseName" : { "Ref": "DBName" },
"DBClusterIdentifier" : { "Ref": "DBClusterID" },
"DBSubnetGroupName" : { "Ref": "AuroraDBSubnetGroup" },
"DeletionProtection" : false,
"Engine" : "aurora",
"EngineVersion" : "5.6.10a",
"MasterUsername" : { "Ref": "DBUsername" },
"MasterUserPassword" : { "Ref": "DBPassword" },
"Port" : 3306,
"VpcSecurityGroupIds" : [ { "Ref": "SGDBInterface" }]
}
},
"AuroraMySQL1": {
"Type" : "AWS::RDS::DBInstance",
"Properties" : {
"AllowMajorVersionUpgrade" : false,
"AutoMinorVersionUpgrade" : true,
"DBInstanceClass" : { "Ref": "DBInstanceClass" },
"DBClusterIdentifier": { "Ref": "AuroraDBCluster" },
"DBInstanceIdentifier" : "instance1",
"DBSubnetGroupName" : { "Ref": "AuroraDBSubnetGroup" },
"Engine" : "aurora",
"EngineVersion" : "5.6.10a",
"PubliclyAccessible" : false,
"Tags" : [ {
"Key": "Environment",
"Value": { "Ref": "Environment" }
} ]
}
},
"AuroraMySQL2": {
"Type" : "AWS::RDS::DBInstance",
"DependsOn": [
"AuroraMySQL1"
],
"Properties" : {
"AllowMajorVersionUpgrade" : false,
"AutoMinorVersionUpgrade" : true,
"DBInstanceClass" : { "Ref": "DBInstanceClass" },
"DBClusterIdentifier": { "Ref": "AuroraDBCluster" },
"DBInstanceIdentifier" : "instance2",
"DBSubnetGroupName" : { "Ref": "AuroraDBSubnetGroup" },
"Engine" : "aurora",
"EngineVersion" : "5.6.10a",
"PubliclyAccessible" : false,
"Tags" : [ {
"Key": "Environment",
"Value": { "Ref": "Environment" }
} ]
}
},
"AuroraDBSubnetGroup": {
"Type": "AWS::RDS::DBSubnetGroup",
"Properties": {
"DBSubnetGroupDescription": {
"Fn::Join" : ["-",[ "DBSubnetGroup", { "Ref": "Environment" }] ]
},
"SubnetIds": [
{ "Ref": "PrivateSubnetA" },
{ "Ref": "PrivateSubnetB" }
],
"Tags": [ ]
}
},
"SGDBInterface" : {
"Type" : "AWS::EC2::SecurityGroup",
"Properties" : {
"GroupDescription" : "Security group for the database",
"VpcId" : { "Ref": "VPC" },
"Tags" : [ {
"Key": "Name",
"Value": {"Fn::Join" : ["-",[ "SG-DB", { "Ref": "Environment" }] ]}
} ]
}
}
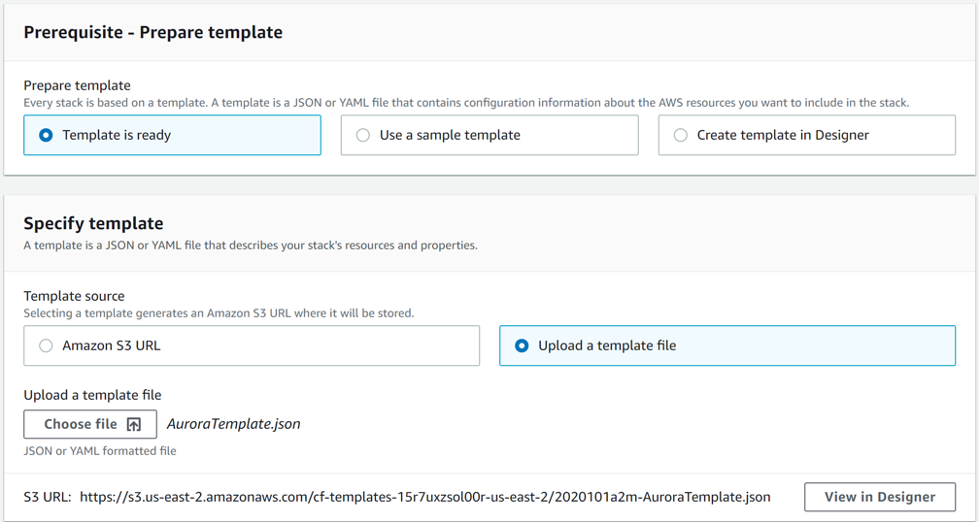
Copy the CloudFormation template “AuroraTemplate.json” from the following repository:
Within the AWS console and in the region that you would like, go to the CloudFormation service and select the option to create a stack. Select the template previously downloaded and upload it to the console.
Enter the information of the following parameters correctly:
Note: Some of these parameters are automatically filled in, nevertheless you can change it according with your requirements.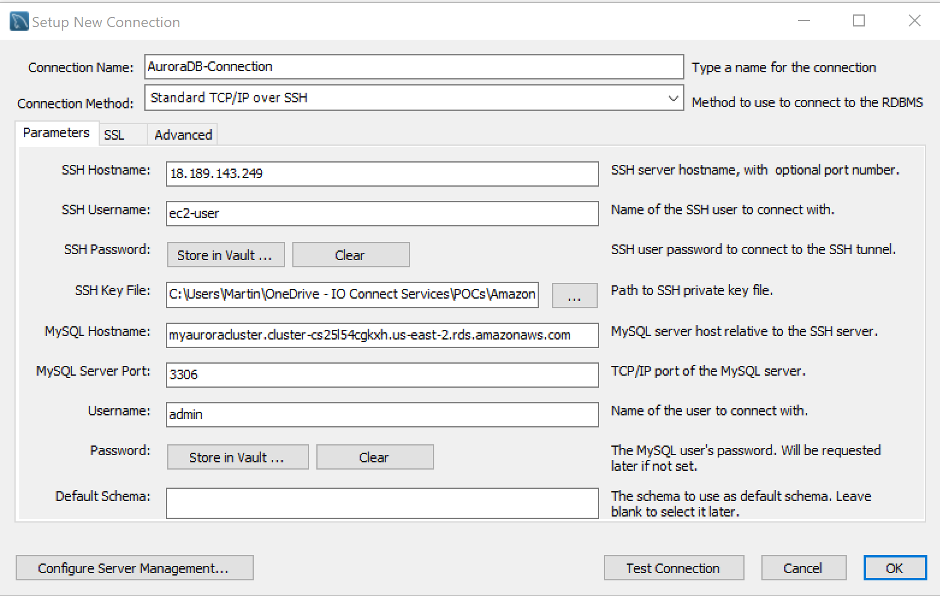
To test the connection, tap on the “Test Connection” button and if you followed all steps correctly, wait for a successful response. The following message should be displayed:

Tap on the “OK” button to create a new connection, then double-click over it to open the Aurora MySQL DB.
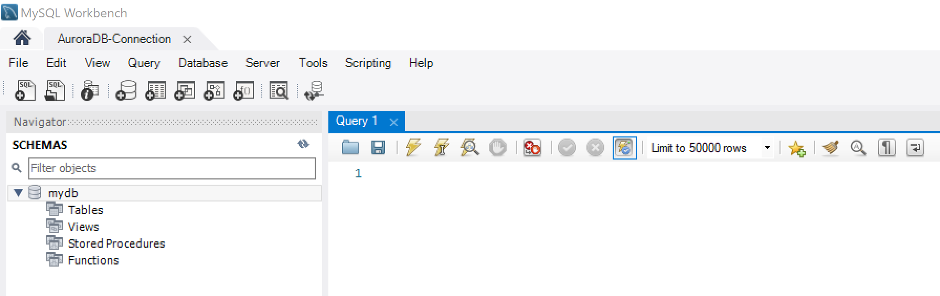
Congratulations, now, you will be able to set up your Database.
For removing all the infrastructure created for the Aurora DB Cluster, just select the stack created previously, tap on “Delete” and wait around 15 minutes to be deleted.

In this article, I showed you how to deploy an Amazon Aurora MySQL DB Cluster based on some AWS security and high availability best practices using AWS CloudFormation. In addition, you can find important advantages in the setup of an Aurora DB Cluster such as high performance getting 5X the throughput of standard MySQL; high availability by its design to offer greater than 99.99% availability, replicating 6 copies of your data across 3 Availability Zones; highly secure, as, it provides multiple levels of security, as we made in the article with the network isolation using Amazon VPC.
Finally, as you can see, you can find many advantages with Amazon Aurora DB, I hope you find this article helpful.